Locksmithing 101: How to AVOID Stripping Threads on A Mortise Cylinder
Today, we're going to talk about aluminum storefront doors, also known as Adams Rite doors, as seen in the image below. If you're new to working on and repairing cars, there are a few major things you should know that if you don't, you'll end up in a lot of trouble, so my objective is to help you avoid that. Let's get this party started.
REMOVING COVER PLATE
As far as the lock is concerned, you'll see the picture below when you enter one of these doors. Depending on the form of the latch mechanism, you'll see two or three separate screws. When it comes to extracting and servicing them, they're all pretty much the same.
Remove the screws as soon as possible. In doing so, I'd like to stress that it's important to note that these doors are literally put together and made to function. When a locksmith or someone else is supposed to work on this door, particularly the lock, things aren't always perfect, which is to be expected, as you'll see later. Once you've removed all of the screws, pop the plate off with the screwdriver.
ANATOMY OF THE LOCK
You'll be looking at these two set screws now that the cover plate has been removed. The cylinders are held in place by these fixed screws.
To show you what you're looking at on the inside, I picked the same lock. The cylinder is held in place by a series of screws, as previously mentioned. I want to demonstrate this for two reasons: The first is the number of threads we're searching for. For this example, it's about four threads, so the mortise cylinder is kept in the lock housing by four threads.
The other thing I'd like to demonstrate is how fragile these things are in terms of what keeps them together. When it's in the lock, all of the set screws are seated in the groove, as seen below. The lock is held in place by a fixed screw in the track.
THE MISTAKE TO AVOID
I emphasized the importance of the cylinder and threads because if you're not careful, you'll strip out the cylinder, the lock threads, or probably both. The primary purpose is to go over how to remove the cylinder from the door and repair/replace it without causing any damage.
I even pull up a picture of the first door I ever did when I was 15 years old as a locksmith for my dad, and the door was a nightmare. Now, I didn't know all the stuff I know today when I was doing it, and I was at that job for three to four hours, and the customer was super unhappy to the point where he even called in and complained about me because I couldn't get it. And the problem was exactly what I'm going to go over today. Alright, so let's go ahead and let's dive in.
REMOVING MORTISE CYLINDER
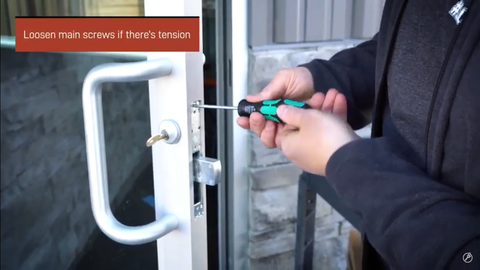
To get the cylinder out to either rekey it or replace it, loosen up the screw here and turn it back for three to four times. Keep it in place rather than totally removing it.
Then, either insert a blank key, such as a Y11 or use the actual key but only insert it halfway. Turn the key counter-clockwise to unscrew the door's lockout, making sure there's no friction when you unwind it.
The angle of the lock into the hole causes the tension. While you're turning the key, you're grinding it through. If you're unfamiliar with the backs of these locks, you'll notice that these two screws, up and down, have springs behind them. As a result, spring friction holds them in place.
If you're getting any resistance turning the key, loosen the main screws until you can turn the key smoothly. If the key is super loose as you turn them, it means that the lock or the latch is aligned with the door, which allows it to spin freely. That's what you want to pay attention to.
I told you about the first one I ever did that the customer called and complained, it was a bad deal. That's 20 years ago, and I still remember it like it was yesterday. The problem was the lock was so unaligned with the hole where the cylinder was, I could not get it out all the way, and then when I finally did get it out, I had stripped out both the lock and the cylinder. Now, after looking at it, I could tell that it was damage ahead at least started before I even got there and why this is so important is that there's going to be a lot of damage that you're going to encounter that's happened before you get there.
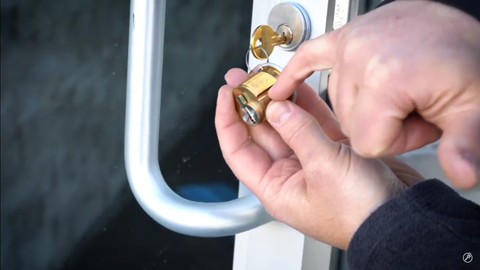
Although it is brand new, there are only a few threads left as I take out the mortise cylinder. Now, whenever you possibly can get rid of the cheap diecast cylinders, replace them with a GMS, or Ilco, solid brass mortise cylinder. It is because cheap cylinders strip easy.
The point here is that there are only a couple of threads on the actual latch that you're screwing into, and it's just going to be touching a couple. So if you mess them up or show up to a job where they're already slightly damaged, you can never get it back together, and that's what you want to avoid. The first sign will be when you start to remove it from the door is that tension.
INSTALL MORTISE CYLINDER
Let's go ahead and take one of these nicer cylinders and then put it on. The key that works it right here, it's another Y11. This is a brand-new cylinder, insert the key halfway, and that's how you're going to want to screw it in the doors.
Take the beauty ring that came with the stock cylinder and put it.
Insert the mortise cylinder back in. I prefer not to start with the key if possible though we'll put the key in there. The reason is that when I put the mortise cylinder, I want to feel it as I turn it counter-clockwise because of how few threads we're working with. We do not want to strip it out at all. In that way, it'll help get it aligned, and I want you to start doing that a little bit. Now, turn it clockwise, and when you felt that you perfectly aligned it into the door and the latch, that's when you're going to use your key that works.
Put the key in about halfway and then at that point, and you can use it to put the mortise cylinder back in until it stops.
Turn it back until it is straight up and down, just like below. Because it's not going to work, and you're not going to hit the little side part that we're going to put that Allen screw in to hold it into place.
Tighten the set screw on the side until it's straight up and down. Put the key all the way in and give it a try once the set screw is secure. If all is working well, get the cover plate and call it a day.
I hope this blog was helpful if you're new to working on this style of door. It would help if you remembered that you only have a few threads to work with. Make sure not to strip them out at all, and keep an eye out when you show up to a job that the person before you has either done a lot of damage to those threads. You don't want to find yourself in a place where I'm at, three hours in, calling the boss, complaining because I can't figure it out. I was probably sitting there looking at the door, confused and nervous. And, you know, that's just the way life works sometimes. I hope this is helpful. If you have questions, please let us know in the comments below.
Article by PJ Slauson
PJ Slauson
In 2004, PJ Slauson (then only 19 years old) was working as a locksmith for his dad’s locksmith company and going to college. His dad had a little DBA side business selling locksmith supplies to locals. He had a few shelves in the back of his key shop with some keychains and padlocks, which PJ started selling online to make a little extra money. He quickly sold out, eventually PJ decided to setup his own website, and clksupplies.com took off immediately.