
It's EASY to Engrave Keys
It wasn't very long ago that you needed two separate machines, one to cut your keys, and then another to engrave them. Let's talk about why you might want to start engraving keys.
- A great service and upcharge you can do for customers, if they want something specific to put on the key.
- It can help you stay organized on a big job.
Here’s a Triton Plus cool feature that you should know!
Before you start engraving, make sure that you have the engraving cutter and jaw. The S5 engraving jaw comes with the Ultimate Edition, otherwise, you can purchase it separately.
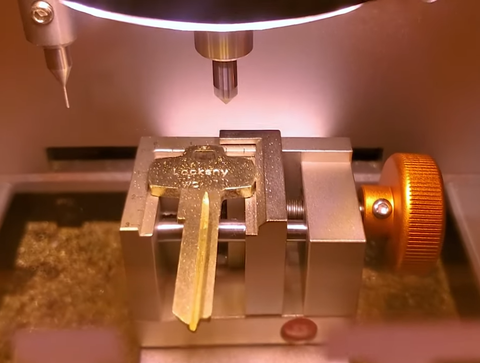
 SETTING UP TO ENGRAVE
Load the key. I used the Best key because it has some interesting shapes, yet some slate for us to put some engraving on. Put it in the jaw and clamp it down tightly. Once the key was clamped into position, go to the screen and hit ‘Measure’ so we know where we can engrave.

After measuring, a pink box will appear on the screen. The pink box represents the area where we can engrave. Tap ‘Add Text’ or ‘Add Picture’ for your desired carving. By dragging, the carving can be moved to your desired place inside the pink box. You can also adjust the size and cut depth of your engraving. Once these settings are set, hit the ‘Cut’ button.

Once it is done, blur the key. At this point, we could go ahead and do another one if we wanted. We can save, edit, and do all sorts of things. I appreciate how simple the dashboard is. It's nice when you don't feel like you need a certificate to operate it.
That is what the engraving looks like on the Triton Plus. I want to know what you think! Thank you, and we'll see you next time.