on all orders over $150*
on all orders over $150*
on all orders over $150*
on all orders over $150*

If you're in the automotive locksmithing world, then you know that Honda ignitions fail constantly. If this is new to you, the more comfortable and familiar you get with the Honda high-security ignitions, the better because it's something you'll be working on. Let's talk about why they fail. And if you look at this picture, at the top, you're going to see a wafer that's brand new, while the wafer on the bottom is pulled out of a used ignition that failed out in the field.

As you can see, there's this one little tiny ridge. This bump is going to make that wafer work properly or not. And so, what happens over time is that as the key goes in and out, it wears the wafer down to a point where it looks like the old one. And all of a sudden, the customer's key no longer turns in the ignition.

It's a two-sided problem because the wafer wearing down is a problem, but it is also a problem if you look at these keys. As you can see, it's worn down; you can see the brand-new code cut key on one side and then the old one on the other side. You can see the worn it has been.
The wafer is getting worn down; simultaneously, the key is getting worn down as well. So a lot of times, when one encounters a failed ignition, they want to replace the wafers and not the key, then the customer calls them, a week later, a month later, their ignition failed again, this time the key is no longer, and you know, it's a problem. So, you want to make sure that you're not only replacing the wafers, but you're also taking the customer's key, and you're putting it back to factory specs. That's how you know you're going to have an ignition working and a happy customer.

I have a new ignition, so if you were able to get the ignition out and get the key turned over, that's great. You can still use that ignition, but if you had to drill out the cylinder, maybe, or use a method that you just felt more comfortable replacing it, you can, and so that's kind of what I'm mimicking here. This is the ASP C19-119 ignition cylinder; I'll put a link to everything I'm using here, below in the notes.

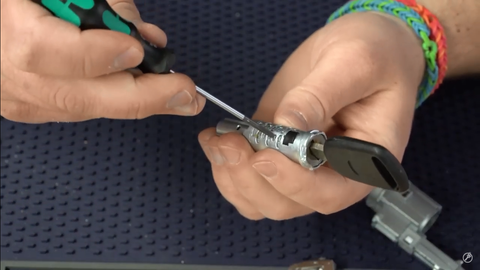
In the ignition cylinder, there's going to be a roll pin. What you need to do it pull it out the rest of the way, then set it aside.

Once that happens, you are just going to take off this little back cap right here and set it aside.

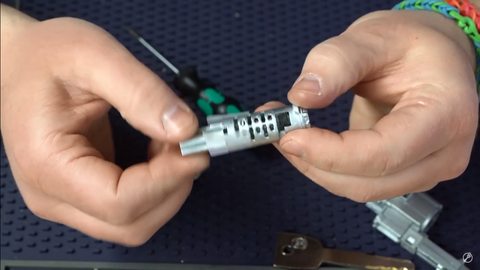
And then, from that point, the whole plug here is just going to come out just like this. You can wipe off the grease while working on it and apply a new one in the end.

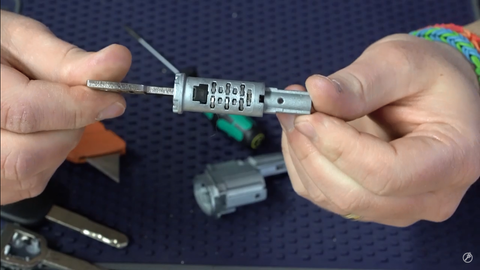
You see here a whole bunch of these little wafers. They use these fingers-split style wafers, except for at the very end, there's one entire wafer.

The most exciting thing that I've heard from many different people is that they're always missing wafers even on the OEM ignitions. So, I just pulled this one out, and as you can see, it doesn't have that entire wafer here at the very end. You can see there's grease in there, but there's no wafer.

At the same time, I've heard a lot that they are missing on the OEM ignitions, these first two wafers right here. Like, I've talked to a couple of guys that said that they've never seen an OEM ignition with these couple first wafers in here. I have no idea why that is, but that's what they're telling me.

What we want to do here is to take the customer's key and pin it up. So, once again, this is a worn-out key. It was really out in the field that it got worn down, no longer worked, and so they opened it up. They took the chip out of it.

I went ahead and decoded this key on our Futura auto that came up with a code cut key. I wrote all the bitting down, so I can pin up this lock. You must get this code here back to this key to original specs.
If you don't have this capability and decoding, probably the best option or the best advice I can give you is to take the existing key and pin up the cylinder one by one. Trying to sight read it and figuring out a way to get what's close. That's what you need to make, so when you put a wafer in and the depth is too deep, so it pushes in a bit of bit, you don't want it tough. And then, at that point, you can back work it to a point where you put them all into where it's out. So the wafers are a little too big for what it is because these cuts will wear down.

Once we have that done here, let's go ahead and get the screwdriver, the one with the perfect size to get into these tiny holes right here on the ignition here. All we need to do is to pop out all the wafers.

Since we have this ignition lock empty, we can go ahead, and we can start pinning it up to the cuts that we need for the key that we got when we decoded it on the Futura Auto. Now, the wafers and everything I'm going to be using is this ASP kit; it's the A19 108. I have a video on it, I go into detail about it, put it in the links below, but it's going to have all the different sizes that we're going to be using, including the spring.

What we're going to do is we're going to take the wafers; we're going to put them in. You have to make sure there's a spring in every single spot intended for the wafer. On this side right here, that has this big ledge on the side; that's where the wafer goes.

So when you go to put these wafers in, they want to fall and rock into not the suitable space here. To address that, get your screwdriver and help it to get in place.
Do the same thing to the next side.

Since we got them both in there, at this point, it's always good; you can put the key that you're working within, you can stick it in, and you can make sure it's going to fit right.

After you're done that, you need a scotch tape piece, and I like to tape it down. Push it down a little bit, but not all the way. You don't want it to cover any of the other holes.
As you can see, I got it just over these two wafers that we just got done. I'm mimicking what it would be like in the lock to keep everything in place.

And the reason why is I must flip this over to the other side to put in the subsequent two wafers. If I don't have that piece of tape on there, and I tried to key it up and stick the screwdriver in there, I could have easily pop out one of these wafers that I just spent time putting in. So, putting the tape on it allows you to keep moving and not worry about if wafers will start falling out.
I've tried to key these without using scotch tape like this, and I tell you, it's like, I feel like you know, it's like two steps forward, one step back, two-step forward, it gets frustrating. So take some tape like this scotch tape here, put it on like that, and keep going.

I'm going to set this one aside here and not bore you with me going through every single one of those, and here is one that I went ahead with, and I keyed it up. The bitting that I use from this old worn-out key and I put on to this new factory code cut key.

As I stick the new key in, and I can look, feel, and see that this is good to go, and it's perfect.

All right. In the same way, when I take this old key and put it in here, I can see how it's not quite perfect, and a lot of these are not suitable, and you have to wiggle it. Not good.

What we're going to do now is I'm going to take a knife, and I'm just going to cut all this tape off, and we'll take a look at this here. Be careful while peeling out the tape.


I'm going to put my key in; that's a good option. As you can see here, it's nice, it's perfectly flush, and looks great. It's perfect on both sides, and it's ready to be inserted back into the ignition.

But I'm going to put my fingers on both sides as I'm going to pull the key.

Make sure you're protecting all your work, and I'm going to take this worn-out key. I'm going to stick it in here. So, these wafers are no longer perfectly sitting on there. They're all a little bit off. So when you put it into the ignition, you can move it up and down a little bit, and you can get it to work, but it's not a great long-term solution.

This is why you want to take it back to the factory bitting here, so let's go and take that out and put this key back in. So, at that point, we're done. We can go ahead; we can stick this back into the ignition here. Pop that up, and we are good to go.

I hope it's helpful. Make sure you use that scotch tape while you're pinning up each individual set of wafers. Thanks, and we'll see you next time.